How to Create a HubSpot Sequence
HubSpot Sequences are a series of personalized sales emails built to nurture your leads.
B2B sales can feel fast-paced and frantic.
But more often than not, sales actually feels more like a marathon than a sprint.
Take getting prospects to agree to an initial call, for example. If every prospect replied to our first message, we’d all be millionaires – but unfortunately for us, the people that want to buy from us usually need 5, 6, 7, or even more touch points before they respond.
That’s where HubSpot sequences come in.
Building a personalized email sequence for every single lead you come across may seem like a lot of work – and that’s before we’ve even talked about getting the timing right and sending them – but this isn’t the case when you’re a HubSpot user.
HubSpot Sequences automate your outreach without sacrificing personalization – leading to higher engagement rates and more booked calls. If that sounds good to you, keep reading: today we’re going to run through the what, why, and how of HubSpot sequences – and how Surfe can make them even better:
- What is a HubSpot Sequence?
- Step 1: Getting Started with HubSpot Sequences
- Step 2: Building Your Sequence
- Step 3: Refining and Activating Your Sequence
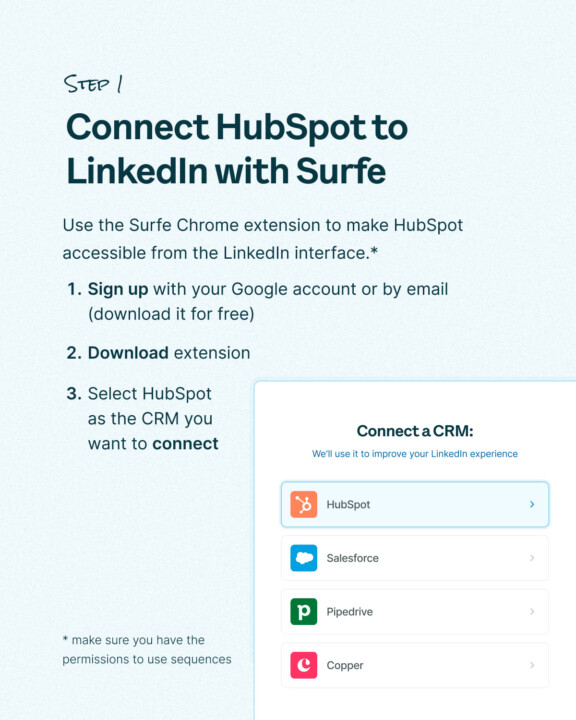
- Step 4: Enhance Your Workflow by Connecting to Surfe
Put your trainers on – let’s get running.
What is a HubSpot Sequence?
In a nutshell, HubSpot sequences automate your outreach. That doesn’t mean you’ll be sending bot-like emails with minimal personalization, though; think messaging that really speaks to the problems of your ICP and always arrives at the right time.
They’re a series of steps that are triggered sequentially (that’s why they’re called a sequence, durrr). A step can either be an email that is sent or a reminder for another kind of action. This means, when a contact reaches a certain step in a HubSpot Sequence, the email is automatically sent without you having to lift a finger.
So now, you can set up a bunch of emails that are sent over days or weeks, and it all happens automatically.
They’re ideal for nurturing leads, or even maintaining engagement with prospects as part of a longer sales cycle, without compromising on time.
Set up a HubSpot sequence and you’ll enjoy:
- Streamlined outreach efforts
- Timely follow-ups
- Better productivity and efficiency for both sales and marketing
Now we’ve covered what they are and why you want one, let’s jump into how to set one up.

Step 1: Getting Started with HubSpot Sequences
First up, a quick note on requirements:
- Obviously, you need to be a HubSpot user (duh)
- You also need to have a Sales Hub Professional or Enterprise seat, or a Service Hub Professional or Enterprise seat
- You need to connect your email address to the sequence
- Your account needs to have sequences permissions
Now, onto the good stuff:
Access the Tool
- Start by logging into your HubSpot account
- Head on over to Automations, then Sequences
Creating a Sequence
- Click on Create Sequence
- Choose to start from scratch or select a template
- Give your sequence a descriptive name to identify its purpose (tip: make this logical – otherwise in 6 months’ time, you’ll be searching for a random name you can’t remember but thought was funny at the time. We’ve all been there).
Step 2: Building Your Sequence
We’ve got the nitty gritty stuff out of the way. Here’s the fun bit:
Adding Steps
Use the sequence editor to customize your sequence to your heart’s content. For example:
- Automated email allows you to send pre-written, personalized emails automatically like, say, when your lead enters the sequence or a certain amount of time has passed
- Task reminders can help you remember manual actions like calls or LinkedIn connection requests. These tasks will be assigned to the person who created the sequence (that’s you!)
Tip: make sure to set the desired time frame between each step – otherwise your leads could receive 5 emails at once, or have a month-long gap in between touches.
Configuring Emails
Here, you can create an email template from scratch – or use one that you’ve already built specially for your audience.
Personalization tokens like the recipient’s name or company details should be a given, obvs.
Customizing Tasks
What these look like will depend on your unique multi-touch, multi-channel strategy.
You might schedule a call or a voicemail, for example – make sure to specify deadlines and reminders to make sure none of these slip through the cracks.
Step 3: Refining and Activating Your Sequence
Nearly there! Just the final pieces of the puzzle to put into place:
Adjusting Settings
Decide when you want to send your emails, and what your notification preferences are.
Check and double-check the sequence to make sure it aligns with your outreach goals: is it as well-thought-out as your strategy is?
Testing the Sequence
Test the sequence on a dummy contact (your own email address is a good one here) to make sure it’s all working. Don’t forget to look on mobile and desktop.
Make any final adjustments you need based on your test results.
Saving and Launching
Hit save – you don’t want all your hard work to go to waste *shudders*.
Start enrolling contacts manually or through workflows, and that’s it – your sequence is up and running!
Step 4: Enhance Your Workflow by Connecting to Surfe
Ok, that’s not quite it – but we promise this last step is worth it. You might have realized that the above steps don’t really cover how to actually find prospects who will want to read your carefully crafted Hubspot Sequences. And that’s exactly where Surfe comes in.
Streamline LinkedIn Prospecting
Our LinkedIn Chrome Extension come’s in handy here.
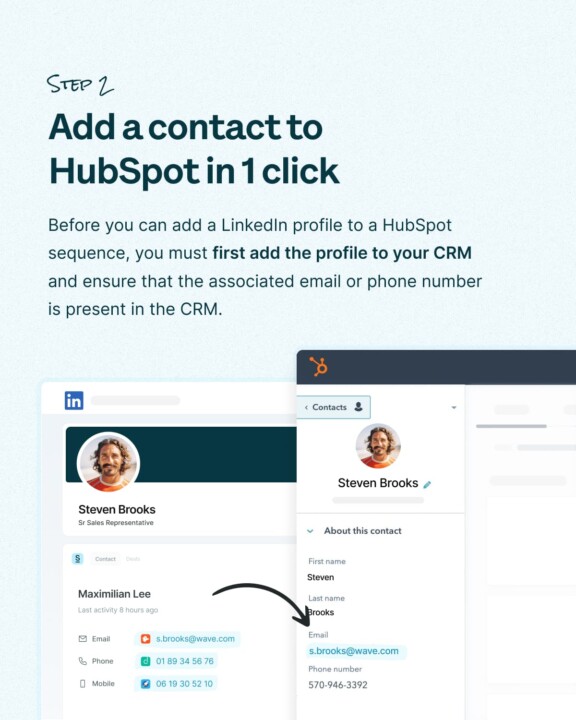
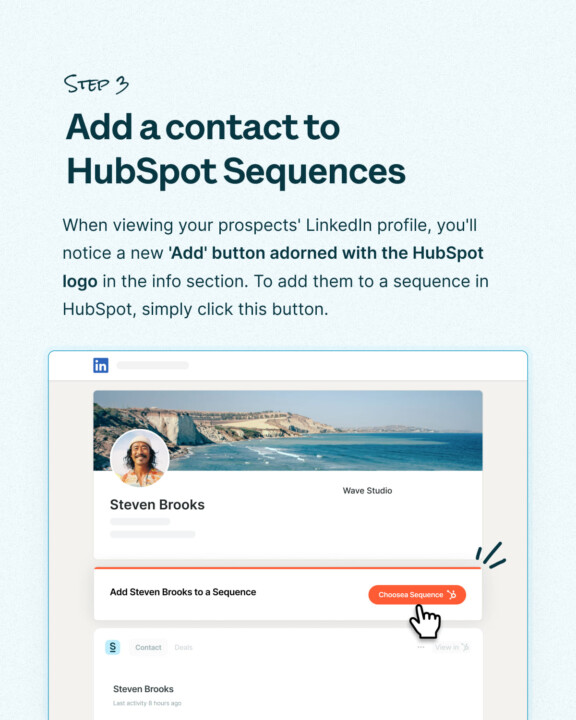
With Surfe, you can add prospects you find on LinkedIn to HubSpot Sequences in just a few clicks. Here’s how:
- Head over to LinkedIn, open the Surfe sidebar on the right, and click ‘Profile’. You’ll see an option to toggle HubSpot sequences on and off – no prizes for guessing which option you want 😉
- Visit your LinkedIn profile of choice. You’ll see an ‘Add’ button in the info section – click it to add this contact to HubSpot
- You’ll then see a new bar above the info section. Click ‘Choose a sequence’ and select the sequence you want to add them to…it really is that easy!
When adding LinkedIn leads to HubSpot Sequences is that speedy, you’re streamlining your entire prospecting process. Say goodbye to carefully filling out HubSpot contact information before manually adding each lead into a sequence, and hello to seamless data transfer that doesn’t have room for human error.
By combining HubSpot sequences with Surfe’s features, you’ll be more productive and have more time to focus on the important stuff: building relationships, helping prospects with problems, and hopefully closing a deal or two along the way.
Let’s Wrap It Up!
Woah – turns out you can run a marathon pretty quickly with Surfe!
When you integrate HubSpot Sequences with Surfe, you’re making your processes much, much faster. Building automated sequences that allow you to send personalized messages at scale, and then adding contacts straight from LinkedIn at the drop of a hat? Sounds pretty good to us.
See you at the finish line…
…oh wait, before you get started, make sure to set up with Surfe!
FAQs About Creating a Hubspot Sequence
What Are HubSpot Sequences?
HubSpot sequences are automated email workflows designed to help you nurture leads and streamline your outreach. They allow you to send personalized emails at just the right time without losing the human touch. You can also include task reminders for actions like calls or LinkedIn connections in your HubSpot Sequences to complete your multi-touch, multi-channel outreach strategy. When done right, HubSpot sequences boost productivity, increase engagement rates, and help you book more meetings – all while freeing up your time for other important tasks.
What Are the Benefits of HubSpot Sequences?
HubSpot sequences save you time while improving your outreach strategy. They help you maintain consistent communication with leads without sacrificing personalization. Key benefits include:
- Streamlined workflows: Automate emails and task reminders.
- Timely follow-ups: Ensure your leads receive messages at the right times.
- Increased productivity: Free up time for relationship-building.
How Can I Create a HubSpot Sequence?
Here’s how to create a HubSpot Sequence in just three steps:
- Getting Started: Log in to your HubSpot account and navigate to “Automations” > “Sequences.” Click “Create Sequence” and either start from scratch or use a template. Tip: give your sequence a clear, descriptive name to avoid confusion later.
- Building Your Sequence: Use the sequence editor to customize your steps. Add automated emails and task reminders (like calls or LinkedIn connections), and set time intervals between each step to keep communication consistent. Personalization tokens are a must-have, of course.
- Refining and Activating: Adjust settings like send times and notification preferences, test your sequence on a dummy contact, and review results. Once you’re happy, hit save and start enrolling contacts manually or via workflows.
How Does Surfe Work With HubSpot Sequences?
Surfe makes HubSpot sequences even better: here’s how. With Surfe’s HubSpot integration, you can add LinkedIn leads directly to a sequence in just a few clicks – no manual data transfer or worrying about errors required. This workflow saves time and lets you focus on what matters: building relationships with prospects and closing deals.

