


How to Export Sales Navigator Lists to a CSV File
TL;DR: LinkedIn Sales Navigator doesn’t let you export lists to CSV. Surfe fixes that with three easy options – Google Sheets, CRM integrations, or the Surfe App. In minutes, you can export, enrich with verified emails and phone numbers, clean messy data, and organize your leads into shareable CSVs or sync them directly to Salesforce, HubSpot, or Pipedrive. More pipeline, less admin. Try Surfe free for 14 days
For sales leaders, working efficiently with lead data is non-negotiable. Sales Navigator is a powerful way to find and save prospects, but once you’ve built those lists, exporting them into a CSV is often the next step to analyze, share, or upload into your CRM. Without a native CSV export in Sales Navigator, turning lists into usable data often means hours of manual copying.
That’s where Surfe comes in. Surfe makes exporting Sales Navigator lists simple, fast, and reliable. In this guide, we’ll walk you through three practical methods – using Google Sheets, your CRM, or the Surfe App – so you can get clean, exportable lists without wasting hours copying and pasting.
Method 1: Exporting Sales Navigator Lists via Google Sheets Integration
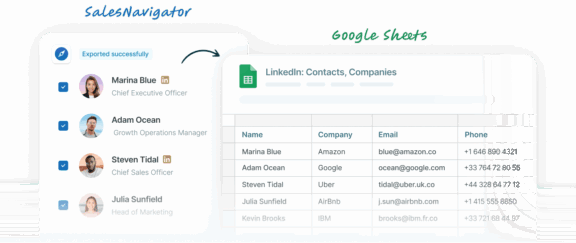
If you’re a spreadsheet wizard and love using Google Sheets, this method is for you. Exporting your Sales Navigator lists through Google Sheets is a smooth, highly versatile process. All you need is to connect your LinkedIn Sales Navigator to Google Sheets through Surfe, and you’ll have your list ready in no time.
Method 1: Export via Google Sheets
Perfect if you live in spreadsheets.
-
Connect Surfe to Google Sheets in the Integrations tab > Find Google Sheets in the list of supported tools > Click Connect and follow the simple authentication steps to link your Google account.
-
Build your list in Sales Navigator using filters for industry, role, or size.
-
Export with Surfe → contacts populate your connected Sheet instantly.
-
Download as CSV (File > Download > CSV).
👉 Best for spreadsheet lovers who want flexible, collaborative lists.
Method 2: Exporting Sales Navigator Lists via CRM Integration
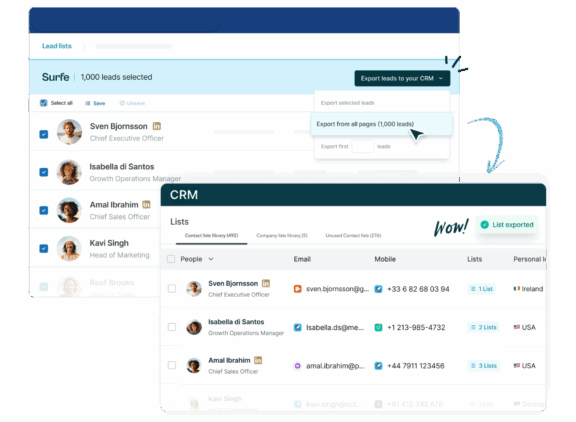
If your sales process is tightly linked to your CRM, this method (integrating your CRM with LinkedIn) will help you bridge LinkedIn Sales Navigator with your existing workflows. Surfe offers integrations with popular CRMs such as Salesforce and HubSpot, enabling you to export Sales Navigator lists directly into your CRM and then export them as CSVs.
-
Connect Surfe to Salesforce, HubSpot, or Pipedrive etc via the Integrations tab
-
Build your list in Sales Navigator.
-
Export with Surfe → contacts sync straight to your CRM.
-
Ensure All Contacts Are Organized in Your CRM → While Surfe does an excellent job of exporting contacts, it won’t automatically create a specific list in your CRM
- Export from CRM as CSV → Download the CSV file, and you’re ready to use it for analysis, email campaigns, or other purposes.
👉 Best for teams who want data cleanly inside their CRM, without extra admin.
Method 3: Exporting Sales Navigator Lists via the Surfe App
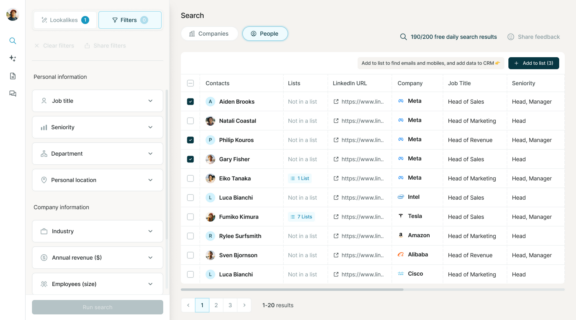
If you’re looking for a centralized one-stop-shop, the Surfe App offers an even smoother experience for exporting lists from Sales Navigator. This method simplifies the entire process into a few clicks — ideal for those who prefer an intuitive, standalone tool.
-
Build your list in Sales Navigator.
-
Click “Add to Surfe List” → contacts flow into the Surfe App.
-
Manage, edit, or merge lists directly in-app.
-
Download as CSV in one click.
👉 Best for sales leaders who want a single workspace for lists, enrichment, and exports.
Got a Messy CSV From Marketing or Another Source? Clean It Up With Surfe
Not every lead list starts in LinkedIn Sales Navigator. Sometimes you’ll get a spreadsheet from marketing after an event, a webinar attendee list, or even a purchased dataset. These lists are often messy, outdated, and full of missing or incorrect contact details. Uploading them straight into HubSpot or Salesforce just pollutes your CRM.
This is where Surfe steps in. Instead of burning hours manually cleaning lists, you can:
-
Upload a CSV directly into the Surfe App
-
Run waterfall enrichment (15+ premium providers checked in sequence) to find accurate phone numbers and emails
-
Validate and filter automatically (bad, duplicate, or personal emails are removed before syncing)
-
Export a clean CSV or sync the enriched contacts straight into Salesforce, HubSpot, or Pipedrive
👉 Ideal for sales leaders who want to turn messy spreadsheets into actionable, revenue-ready lists in minutes.
Let’s Wrap it Up!
Exporting lists from LinkedIn Sales Navigator shouldn’t be a manual headache. With Surfe, you can move from static lists to clean, enriched, and CRM-ready data in just a few clicks. Whether you prefer Google Sheets, direct CRM sync, or the Surfe App, you’ll keep your pipeline moving without wasting hours on admin.